Laser cutting almost always leaves burrs, slag residue, or an oxide edge — but not every part needs deburring or polishing. Whether you need finishing depends on use case: assembly fit, safety, appearance, coating compatibility, and surface roughness (Ra) requirement. Most general industrial parts work fine at “standard deburring” (about Ra 6.3), which typically adds 5–15% to the cutting cost. Mirror-polish (Ra 0.4 or below) is for food, medical, or semiconductor grade only and can add 100–300%. The single most expensive mistake is not specifying finish at quote stage — you’ll either pay twice or get parts you can’t use.
A Singapore facade contractor ordered a batch of laser-cut stainless steel decorative panels. The drawings were perfect, the cutting was sharp, the parts shipped on time — and the client rejected the entire delivery. Why? The edges were technically clean but had visible black oxide lines, sharp corners that could cut hands during installation, and a “raw cut” appearance that didn’t match the architectural finish specification. The job got re-quoted with polishing added; the rework cost more than the original cutting.
This is the single most common surprise for buyers new to laser-cut metal: the cut itself is just the first step. Burrs, slag, oxide edges, and surface roughness all need separate attention — and they all have cost implications that should be priced in upfront, not discovered on delivery. This guide is for procurement officers, design engineers, QA teams, and project managers in Singapore who want to specify and budget finishing correctly the first time.
For the broader cost picture of laser cutting projects in Singapore, see our laser cutting cost guide — this guide deep-dives into the post-processing portion that often determines whether a quote was actually a good deal.
Why Laser Cut Edges Aren’t “Finished” — Burr Formation Explained
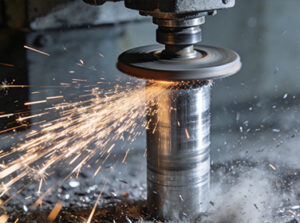
The marketing line “laser cutting delivers clean burr-free edges” is partly true and partly misleading. Fiber laser cutting on thin stainless steel can produce edges so clean that no finishing is needed. But for most production scenarios — especially thicker materials, mild steel, or anything cut with oxygen assist gas — burrs and edge defects are unavoidable byproducts of the physics.
Here’s what’s happening at the cut zone:
- Molten metal flow. The laser melts metal at the cut line; assist gas (oxygen, nitrogen, or air) blows the molten material out the bottom. As the metal exits and solidifies, some inevitably attaches at the bottom edge — that’s the burr.
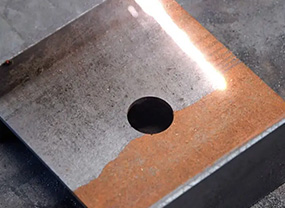
- Oxidation chemistry. When oxygen is used as the assist gas (cheaper and faster for mild steel), the cut edge becomes oxidised — a dark grey to black layer that’s harder than the base metal and visible under any coating.
- Heat dynamics. The cut entry and exit points experience different thermal cycles than the middle of the cut, so burr severity often varies across a single edge.
The clean fiber-laser cuts you see in equipment marketing photos are typically thin stainless steel cut with nitrogen — the best-case scenario. Real production work covers many other scenarios where finishing is essential.
The 3 Types of Edge Defects on Laser Cut Parts
Not all “burrs” are the same. Understanding which defect type your parts have determines which finishing method works.
A single part may have all three defects, requiring different treatments — abrasive deburring for the breakout burr, mechanical knock-off or vibratory finishing for slag, and surface grinding or chemical pickling for oxide removal. This is why “we’ll deburr it” can mean very different things depending on what the supplier actually does.
When You MUST Deburr (and When You Can Skip It)
One of the biggest cost savings in laser-cut sheet metal projects is recognising that not every part needs full deburring. Specifying deburring on parts that don’t require it inflates cost without adding value. The framework:
Where deburring is essential
• Assembly parts (burrs cause fit issues)
• Food, medical, or pharma applications
• Anything handled directly by users
• Parts that will be coated or painted
• Parts that will be welded (clean edges = clean welds)
• Customer-facing visible surfaces
Where the cost isn’t justified
• Hidden internal components
• Parts going to further machining (CNC, grinding) that removes the burr anyway
• Temporary fixtures or jigs
• Prototypes for fit testing only
• When the customer specification explicitly allows mill finish
The practical question for any RFQ: “Where will this part end up, and who will touch or see it?” Parts hidden inside an enclosure don’t need the same finish as parts that form a visible facade. Splitting your order into “needs full finishing” and “mill finish acceptable” can substantially reduce total cost without affecting product quality.
The 5 Methods of Deburring Laser Cut Parts
Five processes dominate industrial deburring, each suited to different part geometries and quality requirements.
Files, Hand Tools, Sandpaper
An operator uses files, deburring tools, or sandpaper to address each burr individually. Slow and labour-intensive, but unbeatable for complex single-piece geometries where automated methods can’t reach. The default for one-off restoration work and very low quantity orders.
Tumbling in Abrasive Media
Parts are placed with abrasive media in a vibrating tub. Friction and impact between media and parts gradually remove burrs and round edges. Handles many parts simultaneously, reaches internal edges and holes, gives consistent results across the batch. Cycle times range from 20 minutes to several hours depending on media and severity.
High-Speed Mass Finishing
Similar concept to vibratory finishing but uses a rotating disc to create much higher media velocity. Works exceptionally well on thin parts where vibratory is too slow. Common for high-volume small-part production where throughput matters.
Wide-Belt or Rotary Brush Machines
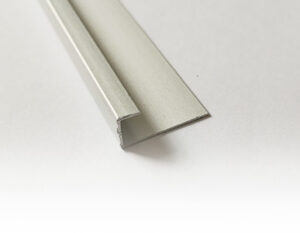
Parts pass through a machine with abrasive belts or rotating brushes that work both top and bottom edges. Industry standard for flat sheet metal production — one pass produces deburred and edge-rounded parts ready for coating or further processing. Often combined inline with the laser cutter for true single-pass production.
Precision Beam Reflow
A focused laser beam vaporises burrs and reflows sharp edges into rounded, defect-free profiles. The most precise method, but the equipment cost limits it to applications where conventional methods can’t deliver — semiconductor parts, medical device components, micro-fluidic features. Rare in general fabrication.
Material-Method Matching: What Works on What
Different materials demand different deburring approaches. Using the wrong media or method can damage parts faster than it cleans them.
| Material | Recommended Method | Media Type | Notes |
|---|---|---|---|
| Stainless steel (304/316) | Vibratory or belt grinding | Ceramic | Industry standard; preserves surface |
| Mild steel | Any method | Ceramic | Most forgiving material |
| Aluminium | Vibratory (gentle) | Plastic | Soft — avoid over-grinding; ceramic media can distort thin parts |
| Brass / Copper | Vibratory (gentle) | Plastic | Soft, preserve original colour; removes oxide layer too |
| Cast acrylic | Manual or vibratory (no abrasive) | Porcelain (non-abrasive) | Avoid scratching transparent surface |
| Thin sheet (<1 mm) | Manual or laser | Soft media only | Mass finishing can curl thin parts |
| Bent / 3D parts | Manual or angle-cut media | Triangular ceramic | Geometry challenges automation |
For acrylic cutting specifically, the laser edge is often the cleanest result — see our acrylic laser cutting edge quality guide for why most cast acrylic parts don’t need deburring at all.
Surface Finish Levels: From Mill Finish to Mirror Polish
“Surface finish” is the metric engineers use to communicate exactly how smooth a surface should be. The standard measurement is Ra (Roughness average, in micrometres) — lower Ra means smoother surface. The right level for your project depends entirely on the application.
Realistic Ra ranges and price premium over basic cutting
| Level | Ra (μm) | Description | Typical Application | Cost Premium |
|---|---|---|---|---|
| Mill finish | 12.5+ | As-cut, no finishing | Hidden internal parts | 0% |
| Standard deburring | ~6.3 | Burrs removed, edges broken | General industrial parts | +5–15% |
| Fine deburring | ~3.2 | Edges rounded, oxide removed | Assembly-critical, coating-ready | +15–30% |
| Brushed finish | ~1.6 | Directional grain pattern | Architectural, appliance, decorative | +25–50% |
| Polished | ~0.8 | Smooth, semi-reflective | Food-grade, pharmaceutical | +50–100% |
| Mirror polish | ≤0.4 | Highly reflective | Semiconductor, optics, premium | +100–300% |
The single most important takeaway: only specify the level you actually need. About 80% of industrial parts work perfectly fine at Standard Deburring (Ra ~6.3). Defaulting an entire drawing to “mirror polish” because it sounds premium can multiply your finishing budget by 5x without adding any real product value.
Real Cost Impact: How Finishing Affects Total Project Cost
Across hundreds of laser cutting projects in Singapore, finishing typically accounts for 10–70% of total project cost — sometimes exceeding the cutting cost itself. Three representative scenarios:
How finishing reshapes total project cost
Scenario A — Decorative Stainless Steel Facade Panels
10 panels, 1.5 mm SS304, brushed finish required for architectural appearance. Cutting: S$280 (40% of total). Brushing and edge rounding: S$420 (60%). Total: S$700.
Scenario B — Industrial Equipment Brackets
50 mild steel brackets, 3 mm thick, standard deburring acceptable. Cutting: S$520 (80%). Standard deburring: S$130 (20%). Total: S$650.
Scenario C — Food-Grade Stainless Tray Bases
20 SS316 tray bases, 2 mm, polished to Ra 0.8 for hygiene grade. Cutting: S$360 (30%). Polishing: S$840 (70%). Total: S$1,200.
The pattern: the more demanding the surface specification, the larger finishing’s share of total cost. This is why a “cheap cutting quote” can become an expensive project when finishing is added at the end — and why an integrated cutting + finishing quote from one supplier usually beats two separate quotes that have to be coordinated.
For comprehensive pricing logic across laser cutting projects, see our laser cutting cost guide for Singapore.
How to Specify Finishing in Your Quote (RFQ)
The fastest way to get accurate quotes is specifying finish clearly at RFQ stage. A drawing that just says “laser cut” leaves the supplier guessing — and the quote you receive will either be too cheap (mill finish only) or too expensive (over-specified).
| What to Specify | Example Wording |
|---|---|
| Default finish level | “Standard deburring per ISO 13715 acceptable” or “Brushed finish, Ra ≤1.6 required” |
| Which surfaces matter | “Visible faces (A-surfaces) to Ra 1.6, hidden faces (B-surfaces) mill finish acceptable” |
| Edge rounding | “Break all edges 0.2–0.5 mm” or “Sharp edges acceptable on hidden features” |
| Oxide removal | “Cut edges to be pickled/passivated for coating” (especially for stainless going to paint) |
| Downstream process | “Parts will be powder coated” or “parts will be welded” — informs finishing intensity |
| Critical features | “Slot fit surfaces to be deburred, drilled hole interiors not required” |
For broader RFQ best practices, see our CAD file checklist for accurate quotes and the sheet metal supplier guide.
DFM Tips: Designing to Reduce Burr Formation
Some burr issues are inevitable, but smart design choices at CAD stage can reduce finishing requirements substantially. Six practical design-for-manufacturability rules:
- Choose appropriate thickness. Burr severity scales with thickness. Where structural needs allow, 1–3 mm sheet metal produces minimal burrs across most laser cutting parameters.
- Specify nitrogen assist gas where finish matters. Nitrogen cutting produces clean, oxide-free edges — slightly more expensive than oxygen but often cheaper than deburring + pickling afterwards.
- Add radii to internal corners. Sharp internal corners create stress concentrations and complicate downstream finishing. Where geometry allows, fillet internal corners by 0.5–1 mm minimum.
- Avoid hairline-thin features adjacent to thick stock. Thermal asymmetry produces inconsistent edge quality. If thin features are needed, design with adequate spacing from heavier sections.
- Specify cutting direction where critical. For directional surface grain on stainless, advise the supplier of the desired grain orientation — affects both cutting setup and finishing approach.
- Consult before finalising tight finish specs. Many “we need Ra 0.8” specifications are actually satisfied by Ra 1.6 once the engineer sees a sample. A short conversation before drawing release prevents over-specification.
For more comprehensive design guidance on sheet metal projects, see our CNC bending tolerance guide — many of the same principles apply.
Common Procurement Mistakes
The five most expensive mistakes Singapore buyers make on laser-cut + finish projects:
Assuming “Laser Cut” Means “Finished”
Buyers compare quotes assuming all suppliers deliver the same finish quality. They don’t. One quote may include standard deburring; another may deliver mill finish only. Always clarify finish at RFQ stage.
Cross-Supplier Finishing
Buying cutting from one supplier and finishing from another adds 5–10 days of lead time, double logistics costs, and quality coordination risk. Integrated cutting + finishing from one supplier almost always beats this on total cost.
Over-Specifying Finish
Defaulting to “mirror polish” or “Ra 0.4” because it sounds premium can multiply finishing cost by 5x without product benefit. Match finish to actual application requirements.
Not Specifying Which Surfaces Matter
Hidden faces, internal features, and back surfaces don’t need the same finish as visible exteriors. Failing to distinguish means paying premium prices for finishing nobody will see.
Ignoring Downstream Process Requirements
Parts going to powder coating need oxide-removed edges; parts going to welding need clean edges for proper weld penetration; parts going to anodising need uniform surface preparation. Failing to inform the finisher of downstream needs causes downstream failures.
Frequently Asked Questions
Do laser cut parts always need deburring?
No. Thin stainless steel (under 2 mm) cut with nitrogen assist gas often produces edges clean enough to skip deburring entirely. Thicker materials, mild steel cut with oxygen, and parts with assembly or aesthetic requirements virtually always need deburring. The right question is “what’s the use case?” rather than assuming a default.
How much does deburring add to laser cutting cost in Singapore?
Standard deburring typically adds 5–15% to the base cutting cost. Fine deburring or edge rounding adds 15–30%. Brushed finish adds 25–50%. Polished finish adds 50–100%. Mirror polish adds 100–300%. These are typical ranges across Singapore suppliers in 2026 — actual quotes vary with material, thickness, geometry, and batch size.
Can you deburr stainless steel without changing the original surface finish?
Yes — selective deburring methods (manual files, soft media vibratory, controlled brushing) can remove burrs while preserving the original mill finish. Tell the supplier explicitly: “Deburr cut edges only, preserve sheet face finish.” Without that note, suppliers may default to abrasive belt finishing that changes the entire surface texture.
What Ra value should I specify for food-grade equipment?
Food-contact surfaces in Singapore typically specify Ra 0.8 or better (polished finish) to meet hygiene requirements — bacterial adhesion increases sharply at rougher surfaces. Some pharmaceutical applications demand Ra 0.4 or below (mirror polish). For non-contact food equipment (frames, panels, brackets), Ra 1.6 (brushed) is usually sufficient.
Does fiber laser cutting really need less deburring than CO2?
Yes for most metals — fiber laser produces narrower kerfs, less heat, and cleaner edges on stainless steel and aluminium compared to CO2. The difference is most pronounced on materials under 4 mm thick. CO2 still leads on non-metals (acrylic, wood, leather), where it produces extremely clean edges that often don’t need any deburring. See our guide on fiber laser vs CO2 laser cutting for the full picture.
How long does deburring add to typical lead time?
For integrated cutting + finishing in one shop: usually 0–1 additional days for standard deburring on a typical batch, 1–2 days for fine deburring or brushed finish, 2–4 days for polishing, 3–7 days for mirror polish. For cross-supplier arrangements (cutting at one shop, finishing at another), add 3–5 days for logistics and queuing on top of these numbers.
See Finishing Processes in Action
Watch our process demonstration videos showing deburring, brushing, and polishing on real laser-cut parts — useful when deciding which finish level fits your project.
Watch Videos →Plan Your Project With the Right Specs
Download our finishing capability sheet, Ra reference samples, and integrated quote template — useful for getting accurate cutting + finishing quotes the first time.
Visit Download Center →Get Integrated Cutting + Finishing Quote in 24 Hours
Three takeaways from this guide:
- Not every part needs deburring — match the finish level to the actual use case rather than defaulting to maximum specification.
- Specify finish at RFQ stage — undefined finish leads to either parts you can’t use or quotes that double on delivery.
- One-shop cutting + finishing beats two-shop coordination — better total cost, shorter lead time, no quality coordination risk.